Strict Aliasing, TBAA and TypeSanitizer
本文首先介绍了 C++ 中的 strict aliasing rule,然后深入分析编译器是如何利用 strict aliasing rule 对程序进行分析优化的,之后介绍了检测 strict aliasing violation 的动态分析工具 TypeSanitizer,最后介绍如何在编程时避免写出 strict aliasing violation 的代码。
Strict Aliasing Rule
首先,我们通过一个例子看下 strict aliasing rule 指的是什么?
考虑如下代码 Compiler Explorer:
#include <stdio.h>
#include <math.h>

float i_am_clever(unsigned int *i, float *f) {
  if (!isnan(*f))
    *i ^= 1 << 31;
  return *f; // Do we need to load *f again here?
}

int main() {
  float f = 5;
  f = i_am_clever((unsigned int *) &f, &f);
  printf("%f\n", f);
}
上述代码,不管是 GCC 还是 Clang 在 O3 优化等级下运行结果都是 5.000000,但是在 O0 的优化等级下运行结果就是 -5.000000。如果在 O3 优化等级下再加 -fno-strict-aliasing 编译选项,此时运行结果就又变成了 -5.000000。
为什么会出现上述现象?简单来说就是上述代码因违反了 strict aliasing rule 而导致代码中存在未定义行为 (Undefined Behavior, UB),而一旦程序中有了未定义行为,则什么事情都有可能发生了。
有关 strict aliasing rule 在 C++ 17 标准中 [basic.lval] 一节有如下描述:
If a program attempts to access the stored value of an object through a glvalue of other than one of the following types the behavior is undefined:
(8.1) — the dynamic type of the object,
(8.2) — a cv-qualified version of the dynamic type of the object,
(8.3) — a type similar (as defined in 7.5) to the dynamic type of the object,
(8.4) — a type that is the signed or unsigned type corresponding to the dynamic type of the object,
(8.5) — a type that is the signed or unsigned type corresponding to a cv-qualified version of the dynamic type of the object,
(8.6) — an aggregate or union type that includes one of the aforementioned types among its elements or nonstatic data members (including, recursively, an element or non-static data member of a subaggregate or contained union),
(8.7) — a type that is a (possibly cv-qualified) base class type of the dynamic type of the object,
(8.8) — a char, unsigned char, or std::byte type.
The intent of this list is to specify those circumstances in which an object may or may not be aliased.
C++ 20 标准中 [basic.lval] 一节的描述则更为精简:
If a program attempts to access (3.1) the stored value of an object through a glvalue whose type is not similar (7.3.5) to one of the following types the behavior is undefined:
(11.1) — the dynamic type of the object,
(11.2) — a type that is the signed or unsigned type corresponding to the dynamic type of the object, or
(11.3) — a char, unsigned char, or std::byte type.
The intent of this list is to specify those circumstances in which an object may or may not be aliased.
因为我不是 C++ language lawyer,所以也就不尝试一一解释上述标准中每一条描述的情况了,在 What is Strict Aliasing and Why do we Care? · GitHub 这篇文章中,作者对 C++ 17 标准中规定的每一种情况都列举了对应的示例代码来解释说明。
由于上述 C++ 标准的存在,所以编译器认为:如果两个指针指向的对象类型不同,那么这两个指针指向的就是不同的内存,或者说这两个指针没有别名关系,这就是 strict aliasing rule(char, unsigned char 和 std::byte 是例外,通过 char, unsigned char 或 std::byte 类型的指针能够合法访问任意其他类型的对象)。
回到我们最开始的例子,函数 i_am_clever 想实现的是:如果浮点数 float 不是 NaN (not-a-number),那么就通过将其最高位取反(IEEE Floating Point 定义最高位是符号位),得到该浮点数的相反数。
因为函数 i_am_clever 的参数类型是 unsigned int *i, float *f ,编译器认为指针 i 和指针 f 指向的不是同一内存,所以编译器认为 *i ^= 1 << 31; 这条语句不会修改 *f 的值,而函数 i_am_clever 的返回值是 *f,所以编译器将函数 i_am_clever 优化成类似如下代码的形式:
float i_am_clever(unsigned int *i, float *f) {
  float tmp = *f;
  if (!isnan(tmp))
    *i ^= 1 << 31;
  return tmp;
}
即在调用 isnan 时,*f 的值是多少,函数的返回值就是多少,这样就可以减少一次从内存中 load *f 的操作。这样就能理解为什么不管是 GCC 还是 Clang 在 O3 优化等级下上述例子的运行结果都是 5.000000 了。
那么问题来了,编译器是如何根据指针指向的对象类型来判断两个指针是否有别名关系的呢?答案是 Type Based Alias Analysis (TBAA)。下面 “Type Based Alias Analysis” 这一节将详细介绍 TBAA 的原理以及 LLVM 中的实现。
注:clang 在 O0 以上优化等级时会开 TBAA,如果添加 -fno-strict-aliasing 编译选项则不会开启 TBAA,llvm-project/CodeGenTBAA.cpp。
Type Based Alias Analysis
所谓 Alias Analysis 即别名分析(又称 Pointer Analyis 即指针分析),是编译器程序分析中的一种技术,简单来说就是用于判断两个指针是否指向内存中的同一对象。
别名分析有很多种算法,Type Based Alias Analysis (TBAA) 就是其中一种经典的算法。TBAA 算法由 Amer Diwan 等人在论文 Type-Based Alias Analysis - PLDI'98 中提出,是一种适用于 type-safe 编程语言的高效而精确的别名分析算法。
在本节我们先学习下 TBAA 论文原文中的算法,然后再学习下 TBAA 在 LLVM 中的实现。
Paper
Type-Based Alias Analysis - PLDI'98 这篇论文在介绍 TBAA 算法时是基于 Modula-3 这个编程语言来进行说明的,所以我们得先了解下 Modula-3 这个编程语言。
Modula-3 是一门 statically typed, type-safe 的编程语言。在 Modula-3 中有三种 memory references:
| Notation | Name | Description |
|---|---|---|
p.f | Qualify | Access field f of object p |
p^ | Deference | Deference pointer p |
p[i] | Subscript | Array p with subscript i |
如上表所示,在 Modula-3 中 p.f 表示访问对象 p 的 f 字段;p^ 表示对指针 p 解引用;p[i] 表示访问数组 p 的第 i 个元素。
在该论文中还有一些符号定义:
将访问内存的表达式称为 access path ($\mathcal{AP}$),例如
a^.b[i].c就是一个 access path。$Type(p)$ 表示 $\mathcal{AP}$ p 的 static type。
$Subtypes(T)$ 表示由类型 T 和 T 的所有子类型所构成的集合。
并且在 Modula-3 中,类型转换只允许在基类和它的子类之间进行,类型 T 的 memory references 能够访问类型 T 及子类的所有字段。
论文中介绍了三种基于类型来做别名分析的算法:
TypeDecl:非常保守的分析,如果两个内存引用/指针具有相同的类型,就认为它们可能互为别名,即可能指向同一内存对象。
FieldTypeDecl:使用字段的类型声明和程序的其他高级信息(如某个字段、数组元素是否被执行过取地址操作)来改进 TypeDecl,使得 FieldTypeDecl 的别名分析比 TypeDecl 更精确。
SMTypeRefs (Selectively Merge Type References):通过分析程序中的赋值语句 (assignments) 来更准确地实现别名分析。
TypeDecl
TypeDecl TBAA 的思想很简单,给定一个 $\mathcal{AP}$ p,TypeDecl 非常保守地认为 p 可能访问所有与 Type(p) 有相同类型或子类型的对象。
更形式化一点的定义:给定两个 $\mathcal{AP}$s p 和 q,TypeDecl(p, q) 认为 p 和 q 互为别名当且仅当 $Subtypes(Type(p)) \cap Subtypes(Type(q)) \ne \emptyset$ 。
举个例子:
TYPE
    T = OBJECT f, g: T; END;
    S1 = T OBJECT ... END;
    S2 = T OBJECT ... END;
    S3 = T OBJECT ... END;
VAR
    t: T;
    s: S1;
    u: S2;
因为 S1 和 S2 都是 T 的子类,所以 TypeDecl 认为 t 和 s 可能互为别名,t 和 u 可能互为别名:$Subtypes(Type(t)) \cap Subtypes(Type(s)) = {T, S1, S2, S3} \cap {S1} = {S1} \ne \emptyset$,$Subtypes(Type(t)) \cap Subtypes(Type(u)) = {T, S1, S2, S3} \cap {S2} = {S2} \ne \emptyset$ 。
但是 TypeDecl 认为 s 和 u 一定不会互为别名,因为 $Subtypes(Type(s)) \cap Subtypes(Type(u)) = {S1} \cap {S2} = \emptyset$ 。
FieldTypeDecl
FieldTypeDecl TBAA 使用字段的类型声明和程序的其他高级信息(如某个字段、数组元素是否被执行过取地址操作)来改进 TypeDecl,使得 FieldTypeDecl 的别名分析比 TypeDecl 更精确。
和 TypeDecl 类似,给定两个 $\mathcal{AP}$s p 和 q,FieldTypeDecl(p, q) 返回 p 和 q 是否可能互为别名。FieldTypeDecl 的具体算法如下表所示:
| Case | $\mathcal{AP}$ 1 | $\mathcal{AP}$ 2 | FieldTypeDecl($\mathcal{AP}$ 1, $\mathcal{AP}$ 2) |
|---|---|---|---|
| 1 | p | p | $true$ |
| 2 | p.f | q.g | $(f = g) \land FieldTypeDecl(p, q)$ |
| 3 | p.f | q^ | $AddressTaken(p.f) \land TypeDecl(p.f, q\hat{})$ |
| 4 | p^ | q[i] | $AddressTaken(q[i]) \land TypeDecl(p\hat{}, q[i])$ |
| 5 | p.f | q[i] | $false$ |
| 6 | p[i] | q[i] | $FieldTypeDecl(p, q)$ |
| 7 | p | q | $TypeDecl(p, q)$ |
$AddressTaken(p) = true$ 表示程序中曾经对 p 有过取地址的操作。例如 $AddressTaken(p.f) = true$ 说明程序中曾经对 TypeDecl(p) 类型的对象的 f 字段有过取地址操作;$AddressTaken(q[i]) = true$ 说明程序中曾经对数组 q 的某些元素有过取地址操作。
FieldTypeDecl 的别名分析比 TypeDecl 更精确,比如对于同一对象的不同字段 t.f 和 t.g,即使它们有着相同的类型,但是因为它们访问的是不同的字段,所以 FieldTypeDecl 会认为它们没有别名关系。
这里需要额外解释一下 case 5,在 Modula-3 编程语言中取数组下标的表达式一定不会和访问对象某个字段的表达书互为别名。
SMTypeRefs
SMTypeRefs 即 Selectively Merge Type References,通过分析程序中的赋值语句 (assignments) 来更准确地实现别名分析。
给定一个 $\mathcal{AP}$ p,TypeDecl 非常保守地认为 p 可能访问所有与 Type(p) 有相同类型或子类型的对象。但是这样就有一个问题,考虑如下的代码:
TYPE
    T = OBJECT f, g: T; END;
    S1 = T OBJECT ... END;
    S2 = T OBJECT ... END;
    S3 = T OBJECT ... END;
VAR
    t: T := NEW (T);
    s: S1 := NEW (S1);
对于上述代码,TypeDecl 认为 t 和 s 可能互为别名,但是显然 t 和 s 之间没有任何直接或间接的赋值语句使他们指向同一个内存对象,所以他们一定不会互为别名。SMTypeRefs 就是在 TypeDecl 的基础上通过分析程序中的赋值语句来提高别名分析的精确度。
SMTypeRefs 的算法伪代码如下图所示:

给定两个 $\mathcal{AP}$s p 和 q,SMTypeRefs(p, q) 认为 p 和 q 互为别名当且仅当 $TypeRefsTable(Type(p)) \cap TypeRefsTable(Type(q)) \ne \emptyset$ 。
举个例子来解释 SMTypeRefs TBAA 算法:
TYPE
    T = OBJECT f, g: T; END;
    S1 = T OBJECT ... END;
    S2 = T OBJECT ... END;
    S3 = T OBJECT ... END;
VAR
    s1: S1 := NEW (S1);
    s2: S2 := NEW (S2);
    s3: S3 := NEW (S3);
    t: T
BEGIN
    t := s1; (* Statement 1*)
    t := s2; (* Statement 2*)
END
Step 1:初始化 Group 集合:{ {T}, {S1}, {S2}, {S3} }
Step 2:
根据
t := s1; (* Statement 1*)更新 Group:Type(t) = T, Type(s1) = S1, Ga = {T}, Gb = {S1}, Group = { {T}, {S1}, {S2}, {S3} } - {T} - {S1} + {T, S1} = { {T, S1}, {S2}, {S3} }根据
t := s2; (* Statement 2*)再更新 Group:Type(t) = T, Type(s2) = S2, Ga = {T, S1}, Gb = {S2}, Group = { {T, S1}, {S2}, {S3} } - {T, S1} - {S2} + {T, S1, S2} = { {T, S1, S2}, {S3} }
Step 3:根据 Group 集合得到 TypeRefsTable 如下:
Type TypeRefsTable(Type) T T, S1, S2 S1 S1 S2 S2 S3 S3
所以根据 TypeRefsTable,可以得到:
t 和 s1 可能互为别名,因为 $SMTypeRefs(t, s1) = TypeRefsTable(Type(t)) \cap TypeRefsTable(Type(s1)) = {T, S1, S2} \cap {S1} = {S1} \ne \emptyset$
t 和 s2 可能互为别名,因为 $SMTypeRefs(t, s2) = TypeRefsTable(Type(t)) \cap TypeRefsTable(Type(s2)) = {T, S1, S2} \cap {S2} = {S2} \ne \emptyset$
s1 和 s2 不可能互为别名,因为 $SMTypeRefs(s1, s2) = TypeRefsTable(Type(s1)) \cap TypeRefsTable(Type(s2)) = {S1} \cap {S2} = \emptyset$
Implementation in LLVM
TBAA 在 LLVM 中是以一种称为 metadata-based TBAA 的方式实现的。因为在 LLVM IR 上,内存是没有类型的,所以直接基于 LLVM 的类型系统做 TBAA 不太合适。Metadata-based TBAA 指的是:基于 LLVM 的编译器(如 clang)在前端生成 LLVM IR 时会在指令上 attach 一些 metadata,这些 metadata 描述了高级语言的类型系统信息,LLVM 就是基于这些 metadata 来做 TBAA 分析的。
本节我们以如下代码为例说明 LLVM 中 TBAA 的实现:
struct S1 { int i; long l; };

struct S2 { float f; double d; S1 s; };

int foo(S1 *p1, S2 *p2) {
  p1->i = 1;
  p2->s.i = 2;
  return p1->i;
}
clang++ -O3 -S -emit-llvm struct-tbaa.cpp 生成的 LLVM IR 如下:
%struct.S1 = type { i32, i64 }
%struct.S2 = type { float, double, %struct.S1 }
define i32 @_Z3fooP2S1P2S2(ptr %p1, ptr %p2) {
entry:
store i32 1, ptr %p1, align 8, !tbaa !5
%s = getelementptr inbounds %struct.S2, ptr %p2, i64 0, i32 2
store i32 2, ptr %s, align 8, !tbaa !11
%0 = load i32, ptr %p1, align 8, !tbaa !5
ret i32 %0
}
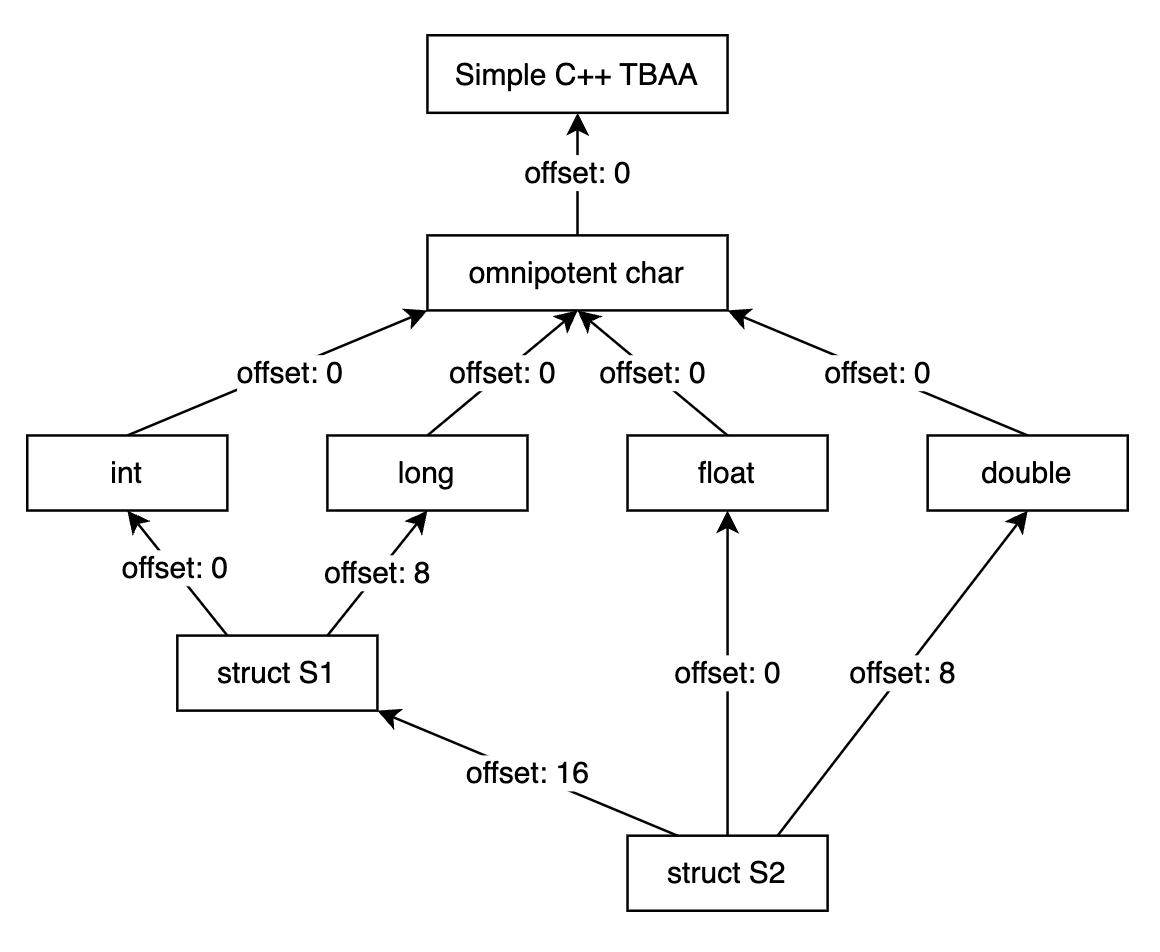
!5 = !{!6, !7, i64 0}
!6 = !{!"_ZTS2S1", !7, i64 0, !10, i64 8}
!7 = !{!"int", !8, i64 0}
!8 = !{!"omnipotent char", !9, i64 0}
!9 = !{!"Simple C++ TBAA"}
!10 = !{!"long", !8, i64 0}
!11 = !{!12, !7, i64 16}
!12 = !{!"_ZTS2S2", !13, i64 0, !14, i64 8, !6, i64 16}
!13 = !{!"float", !8, i64 0}
!14 = !{!"double", !8, i64 0}
TBAA medata
首先学习下 TBAA metadata 是什么。在函数 foo 对应的 LLVM IR 中 load/store 指令之后都有形如 !tbaa !5 的内容,这就是 TBAA metadata。
TBAA metadata node 一共有三种:scalar type node, struct type node 和 path tag node。TBAA type node 之间会形成 DAG。
scalar type node
下述 metadata node 都是 scalar type node。
!7 = !{!"int", !8, i64 0}
!8 = !{!"omnipotent char", !9, i64 0}
!9 = !{!"Simple C++ TBAA"}
!10 = !{!"long", !8, i64 0}
!13 = !{!"float", !8, i64 0}
!14 = !{!"double", !8, i64 0}
scalar type node 最多由三个字段组成:第一个字段通常是字符串,作为该 scalar type 的标识符;第二个字段表示该节点的父节点;第三个字段是一个常数,如果为 1 表示 pointsToConstantMemory 返回 true。
例如
!13 = !{!"float", !8, i64 0}该节点表示的类型是 float 类型,父节点是!8 = !{!"omnipotent char", !9, i64 0}。!8 = !{!"omnipotent char", !9, i64 0}表示的则是 char 类型,父节点是!9 = !{!"Simple C++ TBAA"}。这里为什么要在 char 之前加个 omnipotent(万能的) ?还记得我们在 Strict Aliasing Rule 一章中提到的 C++ 标准么,标准中规定 char, unsigned char 或 std::byte 类型的指针能够合法访问任意其他类型的对象,所以这里用 “omnipotent char” 表示 char 类型可能与任意其他类型之间存在别名关系。(注:C++ 标准中说的是 char, unsigned char 并没有包括 signed char,C 标准则是 char, signed char 和 unsigned char 都包含了,这里 clang 在处理 C++ 时“不太标准”,为 signed char 也生成了 “omnipotent char” TBAA metadata node)!9 = !{!"Simple C++ TBAA"}就是根节点了,所以只有一个标识符字段。这里 “Simple C++ TBAA” 的作用主要是说明这部分 LLVM IR 是 C++ 代码生成的。不同的编译器前端比如 clang, rustc 在生成 TBAA metadata 时生成的根结点是不同的,LLVM 优化时会保守地认为两个根节点不同的 type node 存在别名关系。struct type node
struct type node 由标识符和多个 pair 组成,struct 有多少个成员变量就有多少个 pair。pair 的第一个元素表示成员变量的类型,指向其他的 TBAA type node,pair 的第二个字段表示成员变量的偏移。
例如 struct S1 有 2 个成员变量,所以
!6 = !{!"_ZTS2S1", !7, i64 0, !10, i64 8}由标识符和 2 个 pair 组成。!7表示 struct S1 的第一个成员变量类型是 int,i64 0表示 struct S1 的第一个成员变量的偏移是 0,!10表示 struct S1 的第二个成员变量类型是 long,i64 8表示 struct B 的第二个成员变量的偏移是 8。struct S2 有 3 个成员变量,所以
!12 = !{!"_ZTS2S2", !13, i64 0, !14, i64 8, !6, i64 16}由标识符和 3 个 pair 组成。!13表示 struct S2 的第一个成员变量类型是 float,i64 0表示 struct S2 的第一个成员变量的偏移是 0,!14表示 struct S2 的第二个成员变量类型是 double,i64 8表示 struct B 的第二个成员变量的偏移是 8,!16表示 struct S2 的第三个成员变量类型是 struct S1,i64 16表示 struct B 的第三个成员变量的偏移是 16。path tag node
path tag node 用于标识一次 load/store,attach 到 的 load/store 指令后的
!tbaa就是 TBAA path tag node。path tag node 由四个字段组成:第一个字段是 base type node,可以是 scalar type node 或 struct type node;第二个字段是 access type node,一定是 scalar type node;第三个字段是偏移;第四个字段是可选字段,与 scalar type node 的最后一个字段有着同样的意义,如果为 1 表示本次访问的是 pointsToConstantMemory。p2->s.i = 2;对应的 LLVM IR 就是:
  %s = getelementptr inbounds %struct.S2, ptr %p2, i64 0, i32 2
  store i32 2, ptr %s, align 8, !tbaa !11
!11 = !{!12, !7, i64 16}path tag node 表示的就是对S2.s.i的访问:!12表示S2.s.i访问的 base type 是 _ZTS2S2 即 struct S2!7表示S2.s.i访问的 access type 是 inti64 16表示S2.s.i访问的 i 相对 S2 的偏移是 16
Type DAG
TBAA type node 之间构成了一个 type DAG。
对于 scalar type node,DAG 中会有一条以该节点为起点,以其父节点为终点的边。例如:
!7 = !{!"int", !8, i64 0}
!8 = !{!"omnipotent char", !9, i64 0}
在 DAG 中就存在一条由 int 节点指向 omnipotent char 节点的边。
对于 struct type node,DAG 中会有以该节点为起点,以其成员变量类型节点为终点的边。例如:
!6 = !{!"_ZTS2S1", !7, i64 0, !10, i64 8}
!7 = !{!"int", !8, i64 0}
!10 = !{!"long", !8, i64 0}
在 DAG 中有两条以 struct S1 为起点的边,终点分别为节点 int 和节点 long。
回到本节最开始我们给出的例子:
struct S1 { int i; long l; };
struct S2 { float f; double d; S1 s; };
对应的 type DAG 如下图所示:
Check Alias
现在我们已经知道了 LLVM IR 上的 TBAA metadata 保存了哪些信息,下面我们看下 LLVM 是如何根据这些 TBAA metadata 信息判断两个内存访问之间是否存在别名关系的。
LLVM TBAA 源码中的注释其实将怎样判断两次内存访问是否存在别名关系说明非常清楚了:
// To check if two tags (tagX and tagY) can alias, we start from the base type
// of tagX, follow the edge with the correct offset in the type DAG and adjust
// the offset until we reach the base type of tagY or until we reach the Root
// node.
// If we reach the base type of tagY, compare the adjusted offset with
// offset of tagY, return Alias if the offsets are the same, return NoAlias
// otherwise.
// If we reach the Root node, perform the above starting from base type of tagY
// to see if we reach base type of tagX.
// If they have different roots, they're part of different potentially
// unrelated type systems, so we return Alias to be conservative.
// If neither node is an ancestor of the other and they have the same root,
// then we say NoAlias.
bool TypeBasedAliasAnalysis(PathTagNodeX, PathTagNodeY){
    if (PathTagNodeX == PathTagNodeY)
        return true;
    // Accesses with no TBAA information may alias with any other accesses.
    if (!PathTagNodeX || !PathTagNodeY)
        return true;

    CommonType = getLeastCommonType(PathTagNodeX.getAccessType(),
                                    PathTagNodeY.getAccessType());
    // If the access types have different roots, they're part of different
    // potentially unrelated type systems, so we must be conservative.
    if (!CommonType)
        return true;
    // If one of the accessed objects may be a subobject of the other,
    // then such accesses may alias.
    bool MayAlias;
    if (mayBeAccessToSubobjectOf(/* BaseTag= */ PathTagNodeX,
                                 /* SubobjectTag= */ PathTagNodeY,
                                 CommonType, MayAlias) ||
        mayBeAccessToSubobjectOf(/* BaseTag= */ PathTagNodeY,
                                 /* SubobjectTag= */ PathTagNodeX,
                                 CommonType, MayAlias))
        return MayAlias;
    return false;
}


// Return true if for two given accesses, one of the accessed objects may be
// a subobject of the other. The \p BaseTag and \p SubobjectTag parameters
// describe the accesses to the base object and the subobject respectively.
// \p CommonType must be the metadata node describing the common type of the
// accessed objects. On return, \p MayAlias is set to true iff these accesses
// may alias.
bool mayBeAccessToSubobjectOf(TBAAStructTagNode BaseTag,
                              TBAAStructTagNode SubobjectTag,
                              const MDNode *CommonType,
                              bool &MayAlias) {
  // If the base object is of the least common type, then this may be an access
  // to its subobject.
  if (BaseTag.getAccessType() == BaseTag.getBaseType() &&
      BaseTag.getAccessType() == CommonType) {
    MayAlias = true;
    return true;
  }

  // If the access to the base object is through a field of the subobject's
  // type, then this may be an access to that field. To check for that we start
  // from the base type, follow the edge with the correct offset in the type DAG
  // and adjust the offset until we reach the field type or until we reach the
  // access type.
  TBAAStructTypeNode BaseType(BaseTag.getBaseType());
  uint64_t OffsetInBase = BaseTag.getOffset();

  for (;;) {
    // In the old format there is no distinction between fields and parent
    // types, so in this case we consider all nodes up to the root.
    if (!BaseType.getNode()) {
      assert(!NewFormat && "Did not see access type in access path!");
      break;
    }

    if (BaseType.getNode() == SubobjectTag.getBaseType()) {
      bool SameMemberAccess = OffsetInBase == SubobjectTag.getOffset();
      MayAlias = SameMemberAccess;
      return true;
    }

    // Follow the edge with the correct offset. Offset will be adjusted to
    // be relative to the field type.
    BaseType = BaseType.getField(OffsetInBase);
  }

  return false;
}
我们还是通过例子来学习:
int foo(S1 *p1, S2 *p2) {
  p1->i = 1;
  p2->s.i = 2;
  return p1->i;
}
define i32 @_Z3fooP2S1P2S2(ptr %p1, ptr %p2) {
entry:
  store i32 1, ptr %p1, align 8, !tbaa !5
  %s = getelementptr inbounds %struct.S2, ptr %p2, i64 0, i32 2
  store i32 2, ptr %s, align 8, !tbaa !11
  %0 = load i32, ptr %p1, align 8, !tbaa !5
  ret i32 %0
}
编译器之所以没有将 foo 函数的返回值直接优化为 return 1 是因为编译器发现 p2->s.i 和 p1->i 访问的可能是内存中的同一对象,即存在别名关系。也就是说 p2->s.i = 2 这一赋值语句可能会修改 p1->i 的值,所以不能将 foo 函数的返回值直接优化为 1,而是需要重新从内存中读取 p1->i 的值作为返回值。
判断 p2->s.i 和 p1->i 之间是否有别名关系:
p2->s.i = 2对应的 LLVM IR 指令是store i32 2, ptr %s, align 8, !tbaa !11p1->i = 1对应的 LLVM IR 指令是store i32 1, ptr %p1, align 8, !tbaa !5
详细的 TBAA 算法流程如下:
两个输入 PathTagNode 分别是
!11 = !{!12, !7, i64 16}和!5 = !{!6, !7, i64 0}。!11的 BaseType 是!12即 struct S2,AccessType 是!7即 int,Offset 是 16;!5的 BaseType 是!6即 struct S1,AccessType 是!7即 int,Offset 是 0。显然!11和!5都不为空,并且是不同的 PathTagNode,所以继续执行。因为
!11的 AccessType 就是!7即 int 类型,!5的 AccessType 也是!7即 int 类型,所以 LeastCommonType 就是 int 类型!11的 BaseType 是!12即 struct S2,AccessType 是!7即 int,Offset 是 16。根据!12 = !{!"_ZTS2S2", !13, i64 0, !14, i64 8, !6, i64 16}可知 struct S2 第三个成员变量的类型是 struct S1 且偏移就是 16。所以 PathTagNode!11可以转换为新的 PathTagNode:BaseType 变为 struct S1,AccessType 不变还是 int,Offset 变为16 - 16 = 0,即!11 = !{!12, !7, i64 16} = !{!6, !7, i64 0}。此时发现!11和!5实际上访问的是同一 BaseType(!6即 struct S1) 的同一 Offset 0,所以就认为!11和!5可能存在别名关系,即p2->s.i和p1->i访问的可能是内存中的同一对象!
TypeSanitizer
TypeSanitizer(AKA TySan) 最早由 Hal Finkel 在 2017 年提出 RFC,并且在 2017 LLVM Developers’ Meeting 做了分享。但是截止本文撰写时,TypeSanitizer 的实现还没有被合入社区。最近 Florian Hahn 在 discourse 上发帖希望能 Reviving TypeSanitizer,我也做了一点微小的工作,解决了 TypeSanitizer 在 Linux 下的编译和测试问题,希望后面也能帮忙推进 TypeSanitizer 的发展。
TypeSanitizer 和其他 Sanitizer 如 AddressSanitizer, ThreadSanitizer 一样都是动态分析,TypeSanitizer 用于检测程序中的 type-based aliasing violations。通常 Sanitizer 由三部分组成:shadow mapping, compile-time instrumentation 和 runtime library。所以下面我们从这三个方面展开来介绍 TypeSanitizer 的原理。
在本节,我们使用如下代码为例说明 TypeSanitizer 的原理:
// clang++ -O3 -S -emit-llvm int-long.cpp
#include <cstdio>

long foo(int *x, long *y) {
  *y = 1;
  *x = 0;
  return *y;
}

[[clang::optnone]]
int main(void) {
  long l;
  printf("%ld\n", foo((int *)&l+1, &l));
}
foo 函数对应的 LLVM IR 如下:
define i64 @_Z3fooPiPl(ptr %x, ptr %y) {
entry:
  store i64 1, ptr %y, align 8, !tbaa !5
  store i32 0, ptr %x, align 4, !tbaa !9
  ret i64 1
}

!5 = !{!6, !6, i64 0}
!6 = !{!"long", !7, i64 0}
!7 = !{!"omnipotent char", !8, i64 0}
!8 = !{!"Simple C++ TBAA"}
!9 = !{!10, !10, i64 0}
!10 = !{!"int", !7, i64 0}
Shadow Mapping
Sanitizer 广泛使用了 shadow memory 技术,通过使用额外的内存来记录常规内存的状态。
例如 ASan 对于每 8-bytes 的 application memory 都使用 1-byte shadow memory 来标识对这 8-bytes application memory 的访问是否合法。
TySan 的 shadow mapping 与 ASan 有所不同,TySan 对于每 1-byte 的 application memory 都使用 sizeof(void*) bytes 的 shadow memory 来记录这 1-byte 的类型信息。TySan 的 shadow mapping 计算公式如下:
MemToShadow(addr) = (addr & SHADOW_MASK) * sizeof(void*) + SHADOW_OFFSET
sizeof (void*) 就是计算指针的大小,在 64 位环境下就是 64 bit,即 8-bytes。那么 TySan 的 shadow mapping 为什么设计成这样呢?这是因为 TySan 的 shadow memory 中存储的是指针,所以每 1-byte application memory 都要对应指针大小的 shadow memory。
64 位环境下 4-bytes application memory 对应的 32-bytes shadow memory 的布局如下:
+-----------------+-----------------+-----------------+-----------------+
|Access Descriptor|       -1        |        -2       |        -3       |
+-----------------+-----------------+-----------------+-----------------+
前 8-bytes 存储的是指向 Access Descriptor 的指针,后面 8-bytes 的内容依次是 -1, -2, -3 …
Instrumentation
在编译时启用 TypeSanitizer 后,不管程序的优化等级是多少、不管是否添加了 -fno-strict-aliasing 编译选项,clang 都会在生成的 LLVM IR 上添加 TBAA metadata。
TypeSanitizer 编译时插桩主要做两个事情:generateTypeDescriptor 和 instrumentMemoryAccess。
generateTypeDescriptor
generateTypeDescriptor 就是将 TBAA metadata 转变为程序中的全局变量,TypeSanitizer 将这样的全局变量称作 TypeDescriptor。这样在程序运行时就可以根据这些 TBAA metadata/TypeDescriptor 判断内存访问时是否发生了 type-based aliasing violations。
TypeDescriptor 的定义如下:
enum { TYSAN_MEMBER_TD = 1, TYSAN_STRUCT_TD = 2 };

struct tysan_type_descriptor {
  uptr Tag; // 1 for member_type_descriptor, 2 for struct_type_descriptor
  union {
    tysan_member_type_descriptor Member;
    tysan_struct_type_descriptor Struct;
  };
};

struct tysan_member_type_descriptor {
  struct tysan_type_descriptor *Base;
  struct tysan_type_descriptor *Access;
  uptr Offset;
};

struct tysan_struct_type_descriptor {
  uptr MemberCount;
  struct {
    struct tysan_type_descriptor *Type;
    uptr Offset;
  } Members[1]; // Tail allocated.
  // char Name[]; // Tail allocated.
};
TBAA metadata 中的 path tag node 使用 tysan_member_type_descriptor 来表示
TBAA metadata 中的 scalar type node 和 struct type node 使用 tysan_struct_type_descriptor 来表示
回到本节我们使用的例子,例子中的 TBAA metadata 如下:
define i64 @_Z3fooPiPl(ptr %x, ptr %y) {
entry:
  store i64 1, ptr %y, align 8, !tbaa !5
  store i32 0, ptr %x, align 4, !tbaa !9
  ret i64 1
}

!5 = !{!6, !6, i64 0}
!6 = !{!"long", !7, i64 0}
!7 = !{!"omnipotent char", !8, i64 0}
!8 = !{!"Simple C++ TBAA"}
!9 = !{!10, !10, i64 0}
!10 = !{!"int", !7, i64 0}
对应的生成的 TypeDescriptor 如下:
; !5 = !{!6, !6, i64 0} 对应 @__tysan_v1_long_o_0
@__tysan_v1_long_o_0 = linkonce_odr constant
{ i64, ptr, ptr, i64 }
{ i64 1, ptr @__tysan_v1_long, ptr @__tysan_v1_long, i64 0 }, comdat

; !6 = !{!"long", !7, i64 0} 对应 @__tysan_v1_long
@__tysan_v1_long = linkonce_odr constant
{ i64, i64, ptr, i64, [5 x i8] }
{ i64 2, i64 1, ptr @__tysan_v1_omnipotent_20char, i64 0, [5 x i8] c"long\00" }, comdat

; !7 = !{!"omnipotent char", !8, i64 0} 对应 @__tysan_v1_omnipotent_20char
@__tysan_v1_omnipotent_20char = linkonce_odr constant
{ i64, i64, ptr, i64, [16 x i8] }
{ i64 2, i64 1, ptr @__tysan_v1_Simple_20C_2b_2b_20TBAA, i64 0, [16 x i8] c"omnipotent char\00" }, comdat

; !8 = !{!"Simple C++ TBAA"} 对应 @__tysan_v1_Simple_20C_2b_2b_20TBAA
@__tysan_v1_Simple_20C_2b_2b_20TBAA = linkonce_odr constant
{ i64, i64, [16 x i8] }
{ i64 2, i64 0, [16 x i8] c"Simple C++ TBAA\00" }, comdat

; !9 = !{!10, !10, i64 0} 对应 @__tysan_v1_int_o_0
@__tysan_v1_int_o_0 = linkonce_odr constant
{ i64, ptr, ptr, i64 }
{ i64 1, ptr @__tysan_v1_int, ptr @__tysan_v1_int, i64 0 }, comdat

; !10 = !{!"int", !7, i64 0} 对应 @__tysan_v1_int
@__tysan_v1_int = linkonce_odr constant
{ i64, i64, ptr, i64, [4 x i8] }
{ i64 2, i64 1, ptr @__tysan_v1_omnipotent_20char, i64 0, [4 x i8] c"int\00" }, comdat
注意到,因为 TypeDescriptor 是根据 TBAA metadata 生成的,所以实际上这些 TypeDescriptor 是常量,在编译时确定,并且在运行中不会修改。
instrumentMemoryAccess
开启 TypeSanitizer 后, LLVM IR 的 load/store 指令会被添加 TBAA metadata。TypeSanitizer 会对这些 load/store 指令插桩代码,在运行时检测是否存在 type-based aliasing violations。插桩的代码就是函数 __tysan_access_callback 中的代码。
void instrumentMemoryAccess(Instruction *I) {
    MemoryLocation ML = MemoryLocation::get(I);
    void *Ptr = ML.Ptr;
    uint64_t AccessSize = ML.Size.getValue();
    void *TypeDescriptorFromMetadata = TypeDescriptor(MLoc.AATags.TBAA);
    // __tysan_access_callback is inserted by compiler instrumentation
    __tysan_access_callback(Ptr, AccessSize, TypeDescriptorFromMetadata);
}

void __tysan_access_callback(void *Ptr,
                             uint64_t AccessSize,
                             void *TypeDescriptorFromMetadata) {
    void *ShadowData = MemToShadow(Ptr);
    tysan_type_descriptor *TypeDescriptorFromShadowMemory = ShadowData[0];
    if (TypeDescriptorFromShadowMemory != TypeDescriptorFromMetadata) {
        if (TypeDescriptorFromShadowMemory == 0 /* unknown */){
            bool NotAllUnknownTypeDescriptor = false;
            for (uint64_t i = 1; i < AccessSize; ++i)
                NotAllUnkTD |= (ShadowData[i] != 0 /* unknown */)
            if (NotAllUnknownTypeDescriptor)
                __tysan_check(Ptr, AccessSize, TypeDescriptorFromMetadata);
            __tysan_set(Ptr, AccessSize, TypeDescriptorFromMetadata);
        } else {
            __tysan_check(Ptr, AccessSize, TypeDescriptorFromMetadata);
        }
    } else {
        bool NotAllBadTypeDescriptor = false;
        for (uint64_t i = 1; i < AccessSize; ++i)
            NotAllBadTypeDescriptor |= (ShadowData[i] >= 0)
        if (NotAllBadTypeDescriptor)
            __tysan_check(Ptr, AccessSize, TypeDescriptorFromMetadata);
    }
}
Runtime Library
__tysan_access_callback 中调用的 __tysan_check 函数是在 runtime library 中实现的。
void __tysan_check(void *Ptr,
                   uint64_t AccessSize,
                   void *TypeDescriptorFromMetadata) {
    void **ShadowData = MemToShadow(Ptr);
    void *TypeDescriptorFromShadowMemory = ShadowData[0];
    if ((sptr)TypeDescriptorFromShadowMemory < 0) {
        sptr Offset = -((sptr)TypeDescriptorFromShadowMemory);
        ShadowData -= Offset;
        TypeDescriptorFromShadowMemory = *ShadowData;
        if (!isAliasingLegal(TypeDescriptorFromMetadata,
                             TypeDescriptorFromShadowMemory))
            reportError();
        return;
    }
    if (!isAliasingLegal(TypeDescriptorFromMetadata,
                         TypeDescriptorFromShadowMemory)) {
        reportError();
        return;
    }
    for (uint64_t i = 0; i < AccessSize; ++i) {
        TypeDescriptorFromShadowMemory = ShadowData[i];
        if (((sptr)TypeDescriptorFromShadowMemory) >= 0 &&
            !isAliasingLegal(TypeDescriptorFromMetadata,
                             TypeDescriptorFromShadowMemory))
            reportError();
    }
}

void __tysan_set(void *Ptr,
                 uint64_t AccessSize,
                 void *TypeDescriptorFromMetadata) {
    void **ShadowData = MemToShadow(Ptr);
    ShadowData[0] = TypeDescriptorFromMetadata;
    for (uint64_t i = 1; i < AccessSize; ++i) {
        ShadowData[i] = -i;
    }
}
__tysan_check 中判断是否存在 type-based aliasing violations 的核心是函数 isAliasingLegal:
static bool isAliasingLegal(tysan_type_descriptor *TDA,
                            tysan_type_descriptor *TDB) {
    if (TDA == TDB || !TDB || !TDA)
        return true;

    // Aliasing is legal is the two types have different root nodes.
    if (getRootTD(TDA) != getRootTD(TDB))
        return true;

    return isAliasingLegalUp(TDA, TDB) || isAliasingLegalUp(TDB, TDA);
}

static bool isAliasingLegalUp(tysan_type_descriptor *TDA,
                              tysan_type_descriptor *TDB) {
    // Walk up the tree starting with TDA to see if we reach TDB.
    uptr OffsetA = 0, OffsetB = 0;
    if (TDB->Tag == TYSAN_MEMBER_TD) {
        OffsetB = TDB->Member.Offset;
        TDB = TDB->Member.Base;
    }

    if (TDA->Tag == TYSAN_MEMBER_TD) {
        OffsetA = TDA->Member.Offset;
        TDA = TDA->Member.Base;
    }

    do {
        if (TDA == TDB)
            return OffsetA == OffsetB;
        if (TDA->Tag == TYSAN_STRUCT_TD) {
            if (!TDA->Struct.MemberCount)
                break;
            uptr Idx = 0;
            for (; Idx < TDA->Struct.MemberCount - 1; ++Idx) {
                if (TDA->Struct.Members[Idx].Offset >= OffsetA)
                    break;
            }
            OffsetA -= TDA->Struct.Members[Idx].Offset;
            TDA = TDA->Struct.Members[Idx].Type;
        } else {
            break;
        }
    } while (TDA);

    return false;
}
如果你对照 LLVM TBAA 中 TypeBasedAliasAnalysis() 函数的实现和 TypeSanitizer 这里 isAliasingLegal 你会发现算法几乎是一模一样的!不得不说,TypeSanitizer 算法设计的很精妙!
Case Study
最后,我们通过本节最开始的例子,说明 TypeSanitizer 是如何检测出 type-based aliasing violations 的。
// clang++ -O3 -S -emit-llvm int-long.cpp
#include <cstdio>

long foo(int *x, long *y) {
  *y = 1; // !5
  *x = 0; // !9
  return *y;
}

[[clang::optnone]]
int main(void) {
  long l;
  printf("%ld\n", foo((int *)&l+1, &l));
}

// !5 = !{!6, !6, i64 0}
// !6 = !{!"long", !7, i64 0}
// !7 = !{!"omnipotent char", !8, i64 0}
// !8 = !{!"Simple C++ TBAA"}
// !9 = !{!10, !10, i64 0}
// !10 = !{!"int", !7, i64 0}
这里我们的环境下 int 是 4-bytes,long 是 8-bytes,所以变量 l 对应 64-bytes shadow memory。
初始时,变量
l所在 8-bytes 对应 64-bytes shadow memory 的内容都是 0 即 unknown。执行
*y = 1时首先判断y的 TypeDescriptorFromShadowMemory 的值,因为变量l所在 8-bytes 对应 64-bytes shadow memory 的内容都是 unknown,所以调用函数__tysan_set()进行设置,根据*y = 1将变量l所在 8-bytes 对应 64-bytes shadow memory 设置为如下内容(每一个框表示 8-bytes,tysan_v1_long_o_0 是第 1 个 8-bytes 的内容,-1 是第 2 个 8-bytes 的内容):
+-----------------+-----------------+-----------------+-----------------+
|tysan_v1_long_o_0|       -1        |       -2        |       -3        |
+-----------------+-----------------+-----------------+-----------------+
|       -4        |       -5        |       -6        |       -7        |
+-----------------+-----------------+-----------------+-----------------+
执行
*x = 0时,发现x的 TypeDescriptorFromShadowMemory 值为 -4,TypeDescriptorFromMetadata 为 __tysan_v1_int_o_0。显然 TypeDescriptorFromShadowMemory 不等于 TypeDescriptorFromMetadata,所以调用__tysan_check()函数检查是否存在 type-based aliasing violations。因为 TypeDescriptorFromShadowMemory 为 -4 表示的是偏移,更新 TypeDescriptorFromShadowMemory 指向 __tysan_v1_long_o_0。
此时检查是否存在 type-based aliasing violations 就是检查
!isAliasingLegal(__tysan_v1_int_o_0, __tysan_v1_long_o_0)的返回值。显然 __tysan_v1_int_o_0 和 __tysan_v1_long_o_0 不是 legal aliasing,即!isAliasingLegal(__tysan_v1_int_o_0, __tysan_v1_long_o_0)返回值为 true。
最后调用
reportError()函数报错,报错信息如下:
ERROR: TypeSanitizer: type-aliasing-violation on address 0x7ffcb0e822b4 (pc 0x55b4e6cf04d6 bp 0x7ffcb0e82260 sp 0x7ffcb0e81a18 tid 2615428)
WRITE of size 4 at 0x7ffcb0e822b4 with type int accesses part of an existing object of type long that starts at offset -4
  #0 0x55b4e6cf04d5 in foo(int*, long*) (a.out+0x334d5)
简单总结一下,TypeSanitizer 将检测程序中是否存在 type-based aliasing violations 这一问题转化为了如下问题: 对于同一内存位置的最近两次访问,第一次访问是以 TypeA 类型去访问的,第二次访问是以 TypeB 类型去访问的,判断 TypeA 和 TypeB 之间是否满足 TBAA 别名关系,如果 TypeA 和 TypeB 之间不满足 TBAA 别名关系,那么对于该内存位置的最近两次访问就存在 type-based aliasing violations。
P.S.
本文的最后,简单说下如何在编程时避免写出 strict aliasing violation 的代码。
最常见的违反 strict aliasing rule 的写法就是 type punning:
void func(double d) {
    union u1 {
      std::int64_t n;
      double d;
    };

    u1 u;
    u.d = d;
    printf("%" PRId64 "\n", u.n); // UB in C++,  n is not the active member
}
在 C++ 中实现 type punning 的标准写法应该是 memcpy:
void func(double d) {
    std::int64_t n;
    std::memcpy(&n, &d, sizeof d); // OK
    printf("%" PRId64 "\n", n);
}
上述两种实现编译生成的汇编代码是完全一样的,memcpy 并不会有额外的开销:Compiler Explorer !